A well-maintained bathroom is the heart of a clean and healthy home, and at Freeflo Home Services, we understand the pivotal role that often goes unnoticed: the bathroom fan. Beyond its apparent purpose of eliminating steamy mirrors, this humble appliance plays a vital role in maintaining your bathroom’s air quality.
In this guide, we’ll delve into the significance of a clean bathroom fan, offering a comprehensive overview of the cleaning process and sharing invaluable tips for regular maintenance. Discover how these simple steps can transform your bathroom environment, ensuring you and your family enjoy fresher air and a more comfortable living space. So, let’s dive in and uncover the many benefits of giving your bathroom fan the attention it deserves.
Gather Your Supplies
Before embarking on your journey in cleaning bathroom fan, you must have all the necessary tools and materials.
List of Necessary Tools and Materials
- Screwdriver: You’ll need this to remove the fan cover. Make sure it’s the right size for the screws holding the cover.
- Stepladder or Stool: Depending on the height of your ceiling, you may need a stable platform to reach the fan.
- Vacuum Cleaner with a Brush Attachment: This is your primary tool for removing dust and debris from the fan blades and interior housing.
- Soft-Bristle Brush or Toothbrush: Use this to dislodge stubborn dirt and grime from hard-to-reach areas within the fan housing.
- Cleaning Solution: Prepare a mixture of water and mild dish soap for cleaning the fan cover and interior surfaces. Alternatively, you can use a specialized cleaner designed for fan maintenance.
- Microfiber Cloth or Sponge: These are essential for wiping down surfaces after cleaning.
- Replacement Filter: If your bathroom fan has a replaceable filter, ensure you have a new one on hand if it’s due for replacement.
- Dust Mask: Wearing a dust mask can help protect you from inhaling dust particles during cleaning.
Safety Precautions to Consider : Cleaning bathroom fan
- Turn Off the Power: Ensure the bathroom fan is completely turned off before you begin. Switch off the circuit breaker or remove the fan’s fuse for added safety. This prevents accidental activation while you’re working on it.
- Use a Stable Platform: When using a stepladder or stool, ensure it’s on a flat, stable surface. Always follow safety guidelines for ladder use to prevent accidents.
- Protect Your Eyes and Skin: While cleaning, wear safety goggles and gloves to shield your eyes and hands from any dust or debris that may be dislodged during the process.
- Ventilation: Ensure there is adequate ventilation in the bathroom while cleaning. Open a window or door to allow fresh air to circulate and help dissipate any airborne particles.
- Avoid Moisture Intrusion: While cleaning the interior of the fan, be cautious not to let excess moisture seep into the fan motor, as this can damage the electrical components. Use a damp cloth, not a soaking wet one.
- Handling Electrical Components: If you need to disconnect the fan from the electrical supply, follow manufacturer instructions and, if necessary, consult a professional electrician to ensure safe disconnection and reconnection.
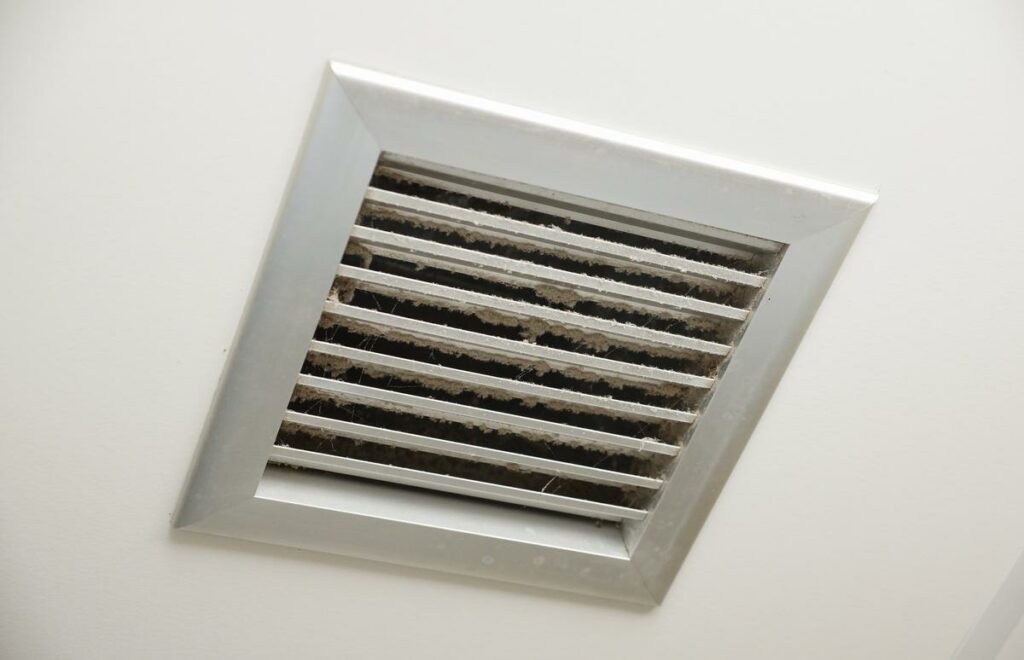
Remove the Fan Cover: cleaning bathroom fan
Step-by-step instructions for cover removal
Removing the fan cover is the first crucial step in cleaning your bathroom fan. To ensure a smooth and hassle-free experience, follow these step-by-step instructions:
- Turn Off the Power: Turn off the power to the fan at the circuit breaker or remove the fuse. Safety is paramount during this process.
- Locate the Screws: Examine the fan cover on the ceiling. You’ll notice a series of screws securing it in place. Use a screwdriver to loosen and remove these screws carefully. Please keep them in a safe place for reassembly.
- Gently Detach the Cover: With the screws removed, gently pull the cover away from the fan housing. Be cautious not to apply too much force, as you don’t want to damage the cover or the ceiling.
- Inspect for Dust and Debris: As you remove the cover, take a moment to inspect its interior. Dust and debris accumulate here, contributing to reduced airflow and efficiency. You can use a soft-bristle brush or a vacuum with a brush attachment to remove loose particles.
- Cleaning the Cover: Now that the cover is detached, it’s an excellent time to clean it thoroughly. Depending on the material, wash it with warm, soapy water or wipe it down with a damp cloth. Make sure it’s scorched before reattaching it.
Cleaning and maintenance tips for the cover
Maintaining your fan cover is essential for hygiene and the efficient operation of your bathroom fan. Here are some additional cleaning and maintenance tips for the cover:
- Regular Cleaning: Make it a habit to clean the cover with your regular bathroom cleaning routine. This prevents the buildup of grime and mold.
- Mild Cleaning Solutions: If your fan cover is particularly dirty or greasy, mix a mild solution of water and dish soap to clean it. Avoid abrasive cleaners or harsh chemicals, which can damage the cover’s finish.
- Inspect for Damage: Periodically inspect the cover for any signs of damage, such as cracks or discoloration. If you notice any issues, consider replacing the cover to ensure proper ventilation.
- Replace If Necessary: Over time, fan covers can become brittle or discolored due to exposure to moisture and steam. If your cover is in poor condition, it’s wise to replace it for aesthetic and functional reasons.
Vacuum the Blades
Using a vacuum with a brush attachment
When cleaning your bathroom fan, one of the critical steps is giving those blades a thorough cleaning, and using a vacuum with a brush attachment is the way to go. The brush attachment effectively dislodges and captures dust and debris that may have accumulated on the blades over time.
Using a vacuum is essential because it removes loose dirt and prevents it from circulating back into the bathroom air, which can happen when wiping with a cloth. The brush attachment’s bristles are specially designed to agitate and loosen dirt, ensuring a more comprehensive clean.
Safety reminders while cleaning
While cleaning the fan blades, it’s crucial to prioritize safety. Here are some important reminders to keep in mind:
- Turn Off Power: Always ensure that the power to the bathroom fan is turned off before starting the cleaning process. This prevents any accidental activation of the fan while your hands are near the blades.
- Use a Sturdy Ladder or Stepstool: To reach the fan comfortably and safely, use a sturdy ladder or stepstool. Avoid standing on unstable objects or overreaching to prevent accidents.
- Wear Safety Gear: Depending on the extent of dust and debris, consider wearing a dust mask or safety goggles to protect your respiratory system and eyes from particles that may become airborne during the cleaning process.
- Be Gentle: Handle the vacuum and brush attachment carefully, ensuring you don’t apply too much pressure on the blades. Excessive force could damage the fan.
- Check for Loose Parts: As you clean, be attentive to any loose parts or screws that may have come undone. It’s an excellent opportunity to tighten loose connections to ensure the fan functions correctly.
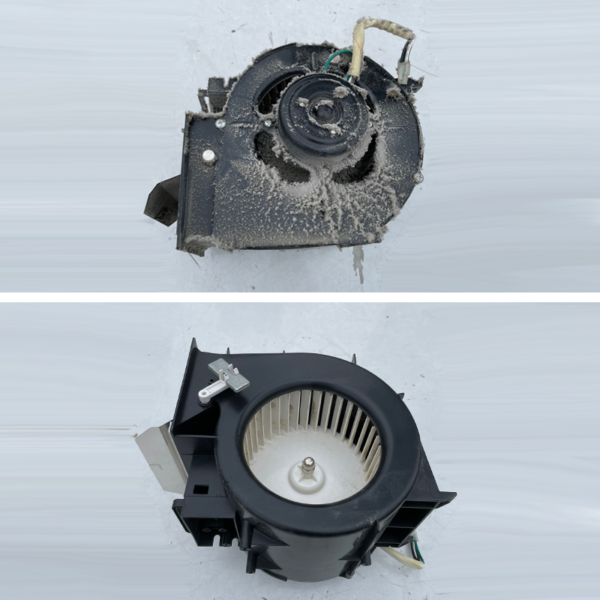
Clean the Interior Housing
Inspecting and Brushing Away Dust and Debris
Once you’ve removed the cover, it’s time to delve into the heart of your bathroom fan – the interior housing. Begin by inspecting the interior for any accumulated dust and debris. Often, over time, these particles can hinder your fan’s performance.
Use a soft-bristle brush or an old toothbrush to dislodge the dust gently. Don’t press too hard; you don’t want to damage any components. Ensure you reach all the nooks and crannies, including the corners and edges where dirt tends to hide.
Wiping Down the Interior Surfaces
After brushing away loose dirt, it’s time to wipe down the interior surfaces. Dampen a cloth or sponge with a mixture of water and mild dish soap, ensuring it’s not too wet to avoid excess moisture getting into the fan motor.
Wipe down all accessible surfaces, removing any remaining dust or grime. Pay special attention to the area around the fan blades and the motor. This step improves the fan’s performance and helps maintain a cleaner, mold-free environment in your bathroom.
Preventing Moisture Damage
Keeping moisture in check while cleaning the interior housing is essential. Excess moisture can lead to mold growth and damage sensitive electrical components. So, be cautious about how much water you use during cleaning, and ensure everything is dehydrated before reassembly.
Regularly checking for and addressing any water leaks in your bathroom can also help prevent long-term moisture-related damage to your fan.
Conclusion
In conclusion, by following the straightforward steps outlined in this guide, you can easily ensure the cleanliness and functionality of your bathroom fan. Regular maintenance, as advocated by Freeflo Home Services, is not only a practical approach but also a vital one for maintaining optimal indoor air quality and enhancing the overall comfort of your home.
Please don’t underestimate the impact of a clean bathroom fan; it removes excess humidity and unpleasant odors and reduces the risk of mold and mildew growth, contributing to a healthier and more pleasant living environment. So, remember when cleaning bathroom fan as part of your routine home care, you’ll enjoy the benefits of a fresher, more comfortable space for years to come.